
5 Tips For Saving Money on Art Supplies
Recently, someone was watching one of my videos and commented on how much paint I was using to demonstrate. Many beginning painters and even more experienced painters on a tight budget can be very hesitant about using materials for fear of wasting them. I can SO relate to this feeling! If you’re one of these “Frugal Frannies” as I was, this video is for you.
Most of us can benefit from finding ways to save money, so I have some of my top tips. PLEASE share yours in the comments below.
1. Surfaces
The most common surface material for painting is stretched canvas. Buying the pre-stretched canvases is your most expensive option. Here are some alternatives:
- Canvas board: Canvas boards are canvas stretched over cardboard and come primed with gesso and ready to.
- Cardboard, heavy Bristol board or chipboard. Before painting, I would suggest prepping the surface with gesso.
- Wood: You can often get pieces of wood inexpensively at a lumberyard in their scrap bin. If you want to buy larger quantities, try Masonite or MDF board and have the large sheets cut to your preferred size on site.
- Heavy weight rag paper: Available at art supply stores. You may need to ask a sales associate to show you which papers are 100% rag. You will want to prep the surface with gesso before painting on paper.
2. Paint
There are many grades or quality levels of paints. Student grade paints are more economical but not all are created equal. If you are interested in learning more, you can watch my video on the 4 Different Types of Acrylic Paint. Two student grade paint brands I can suggest are:
- Liquitex Basics – get a lot of paint for your money with good pigment load.
- Windsor Newton Galeria – has a good pigment density
A quick note on housepaint because I often get asked about it – it’s not meant to last a long time and has less pigment but is ok for learning and practice.
3. Brushes
I have another video where I discuss different types of brushes. I strongly believe that if there is anything you are going to spend good money on, invest in good brushes. Poor brush quality can make paint hard to control.
4. Palettes
A lot of times beginners and students use disposable palettes. I don’t prefer these because of the impact on the environment and the fact that they actually get expensive because you keep having to replace the pad once you run out.
Another disposable material you can use is freezer paper that is found at most grocery stores. It’s the same material as the disposable palettes, but it’s a lot cheaper.
I prefer the butcher tray palette. It’s a metal tray covered in enamel. You can easily cover it and keep paints wet for future painting sessions. Please watch this video for more details.
5. Bargain shopping
Art supply stores often have “Back to School” sales. Look for these at the beginning of the school semester. Many stores also have coupons or coupon apps.
You might also try Ebay. In a quick search I was surprised how many acrylic paints came up. Just make sure that if you are purchasing from someone online that they have good reviews and accept returns. Garage sales and estate sales, thrift stores and reuse stores may also yield new or gently used art supplies.
Here are some resources for artists in the SF Bay Area:
Scrap 801 Toland St, San Francisco, California 94124 (enter on Newcomb)
East Bay Depot for Creative Re-Use 4695 Telegraph Ave. Oakland California USA
FabMo Designer fabric and samples for creative re-use 970 Terra Bella Avenue, Suite 5 Mountain View, CA 94043
I’d love to know: How do you save money on supplies? Please share your tips in the comments below!
Leave a Comment
How to Remove Dried and Hardened Paint from Your Paint Brushes
Assuming you take excellent care of your brushes – wiping them carefully, washing them in warm soapy water after each use, it’s still common for paint residue to build up around the ferrule* over time. I find many beginning acrylic painters just rinse their brushes in water after a painting session without using soap. The paint comes out, but the clear acrylic polymer stays in the brush so they look clean but the bristles dry stiff and the brush is unusable.
I used to think when oil or acrylic paint dried in a brush and it became hardened that it was a lost cause. I tried lots of things – soaking them overnight in soap or solvent, depending on whether the paint was oil or acrylic. I experimented with all kinds of specialized brush cleaning products such as Kiss-Off, the Masters, EZ-Air cleaner with limited success. The bristles were still stiff and some of the paint would come out but not all of it. I also tried to get dried acrylic out with the soaps many artists recommended such as Fels-Naptha, Murphy’s Oil Soap without success. Once a brush became hardened, I had to throw it out.
It wasn’t until Winsor and Newton came out with theirBrush Cleaner and Restorer ** that I found the perfect solution for reviving old brushes. What I really love about it is that it is environmentally friendly as it is both non-toxic and biodegradable. (But remember the paint and pigments you remove from the brush might not be, so once it is used, please dispose of it in your local Household Hazardous Waste facility.) I reuse the brush cleaner over and over by allowing it to stand in a clear glass jar. The pigment particles settle to the bottom of the jar and the liquid at the top can be poured off and reused for the next cleaning.
Here is a pdf the MSDS (Material Safety Data Sheet) for Winsor & Newton’s Brush Cleaner and Restorer.(On some computers the download will begin immediately. Please check your downloads folder.)
* Watch the video to find out what a ferrule is!
**affiliate link (By purchasing through this link you help support costs of running this website, email service, create videos etc.)
Have you ever had to throw out a brush that became too stiff to use? Do you have any hardened, dried up paint brushes? What are your solutions? Share your thoughts and tips in the comments section below!
Leave a Comment
Cleaning up Acrylic Paint
A question I get over and over again is about proper disposal and clean up of acrylic paint.
Here’s a video I made showing precisely that:
My favorite part is watching the paint pucker up and peel up in a sheet. Watch for my tip at the end for how to dispose of all those palette scrapings in a way that won’t hurt the environment OR your plumbing.
In addition, I recently came across this great resource from Golden paints that shows how to dispose of acrylic waste water in an environmentally friendly way:
Any thoughts of your own? Questions? Please leave them in the comments section directly below the video so everyone can benefit!
Leave a Comment
How to test and analyze your acrylic mediums
What’s the best brand of acrylic paints?
I get asked that question a lot when I teach acrylic workshops.
When I was an undergraduate student at the School of the Museum of Fine Arts in Boston, a professor I liked and respected touted a particular brand of acrylics as the “best.” So, I took her word for it and started using that brand over others. But there are lots of excellent brands out there and once I became a bit more experienced, I got curious about what made different brands of paint different.
The truth is there are a number of good paints out there and rather than telling you about the merits of each, I thought I’d show you how I test acrylic mediums in my own studio. The results are always interesting. And this empowers you to make your own informed choices about what will work best for you.
Here are links to the materials listed in the video above:
GAC 200- 8oz.
GAC 200- 16oz.
GAC 800
Medium B
Liquitex Matte Medium
Liquitex Gloss Medium & Varnish
Liquitex Clear Gesso
Acetate Pad 9″ x 12″
Share in the comments below what brands you like to use? Do you stick with one brand for everything? Do you mix and match?
Have you ever had a really (or really great) bad experience with a particular paint or medium? Do tell!
Leave a Comment
Drawing Kit Giveaway December 2014
I’ve been cleaning up my studio and deaccessioning many of my supplies. I put some of the nicest things aside to giveaway in the coming months to you, my loyal subscribers. Here’s a video I made talking about different types of charcoal and erasers and what they are used for as well as showing you the other goodies in the kit.
Here’s what you’ll need to do to complete your entry.
1. Like this video and mention in comments below that you are entering.
2. Share one of your favorite videos or blog posts I’ve made on social media and please mention in your post why you like the video.
3. TAG me on Facebook Michele Theberge artist
https://www.facebook.com/pages/Michele-Th%C3%A9berge-artist/141639189231397
or Twitter @MicheleTheberge so I see it.
That’s it! Once you do those 3 things you’re in and I’ll contact you on January 7, 2015 if you’ve won. I’ll announce the winner in the next giveaway video.
GOOD LUCK!
Leave a Comment
Tips and Motivation for Getting Organized
Did any of you get bit by the organizational bug recently?
Maybe it was the freshness of the new year. In January, I suddenly found myself wanting to straighten up and organize my office supplies closet. In the studio, I went through my boxes of drawings, drawers of supplies and tools. In my bedroom, I watched a bunch of videos on folding clothing and my freshly coordinated dresser is gorgeous to behold now! I even got renewed energy for purging and freshening up my paper files.
I find once I get the urge that it’s best to follow it in the moment.
But, what if you never get the urge?
What if your stuff feels a little out-of-control and you feel overwhelmed?
In polling many artists, I’ve found that organization can be one of the most challenging areas. I believe a lot of this has to do with the fact that most artists are right brain dominant. That’s not the part of our brain that organizes.
Please know that even if you feel out-of-control with this that you can change! And you can do it in a way that supports you and makes sense for you!
Take a moment, right now, and imagine an area of your life that you’d like to get more organized. Picture how satisfied, invigorated or accomplished you will feel when this has been completed. Imagine how it will make you more efficient and fluid in your daily life.
Savor all the benefits you will gain from this shift.
Maybe you’ve been shamed in the past for messy habits and have just given up. Most of the magazine images of organization are intimidatingly Martha-Stewart perfect. Your system doesn’t have to be magazine-perfect it only has to work to make you happy, satisfied and efficient!
Because the visual sense is so dominant for artists many need to have things out where they can see them. Unless you have a workable system, this can lead to clutter and overwhelm.
Reflect on how the typical kitchen is organized. If you walked into a complete stranger’s kitchen and tried to make a cup of tea you could probably guess that the silverware is in the drawer and not in the cupboard above the sink. The tea kettle may be on the stove or an electric one on the countertop. Likewise, most people seem to put their teacups, mugs glasses and plates in the high shelves, and bigger, heavier pots in the lower shelves.
Why don’t we leave everything out and visible in our kitchen? Why not leave the orange juice on the counter in the frozen french fries and next to the stove? Why not just pile up the pots on the empty chairs? Why not just have a mound of eating and serving utensils on the table? After all, that’s where we’re going to use it next.
And yet some of us approach our studios this way. We leave everything out.
Now, this may work perfectly fine for you. If so that’s great! Read no further.
But, if you’re frustrated with the way things are set up in your studio, why not rethink it?
The difference between our studios in our kitchens is there are pretty established conventions and systems for kitchens. I’ll wager these have been developing over centuries.
As far as their studios go – we’re sort of flying free trying to figure out what will work.
Think about your space and how you use it. What materials and tools to you reach for most often?
Which materials and tools are used less frequently?
Find places for your most used tools that are within easy reach of your workspace.
“A place for everything, and everything in its place” may sound like a cliché, but it’s actually some pretty useful advice.
If you have a place for everything and know you can always, always find your Conté crayons in the box on the top shelf of your tabouret, then, you don’t have to spend time looking for them.
When creative inspiration hits, all you have to do is get started. Not wade through a pile of mess before you do.
Part of this is also about establishing a cleanup routine. But that’s a subject for another post. (Let me know if you’d like me to write about that as well.)
Have you thought about using open bins for storage? Clear plastic bins are convenient, and I’ll admit I have some in my studio but, because of the environmental impact of plastics I am not a big fan of buying a lot of plastic if I can avoid it.
However, I have some white cardboard boxes with clear windows in them so I can see the contents at a glance. You could even make little windows for your cardboard boxes by cutting holes in them and taping acetate behind the hole.
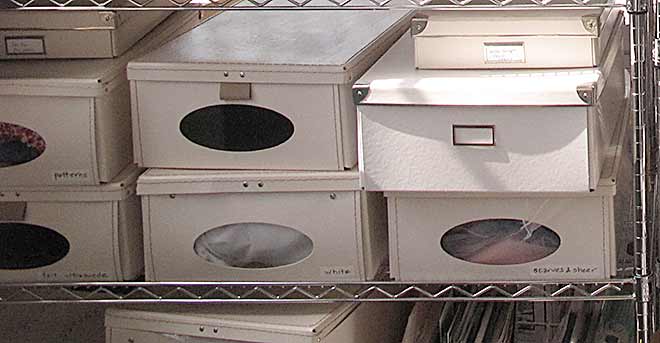
I also spray-paint cardboard boxes white, because I like the clean look of everything in my studio being white.
It makes my drawings, paintings and installations stand out more clearly as the most important thing in the room.
Painting recycled cardboard boxes is an affordable way to create a clean sleek look in your studio.
Labeling everything is also hugely important. I use white artists’ tape and a permanent, felt tip marker as an inexpensive labeling system. Every thing has a place and everything in its place.
If there’s something in your studio that needs organizing and you’ve been putting it off, I suggest you start very, very small. Pull out your calendar right now, and schedule a 15 minute organizing date with yourself.
When it comes time to get down to it, set a timer and stick to only 15 minutes! If you have trouble with organization, chances are there’s a part of you that rebels against being forced to clean up and tidy. Perhaps your inner teenager? Knowing that you only have to go at it for 15 minutes makes it manageable and unintimidating.
That’s exactly what this video is about. Check it out and let me know your thoughts!
http://www.youtube.com/watch?v=39vnXSagD40?rel=0
Here is a list of materials to help you get started:
Archival storage boxes
Artist tape
Leave a Comment


